We’ve all been vibe-coding—riding the wave of AI-assisted development with flashes of brilliance and bursts of productivity. But as the dust settles, it’s clear: this approach doesn’t scale. It doesn’t architect business-grade applications.
AI can’t replace the human, and it shouldn’t. But when paired with a skilled developer, something remarkable happens: the team becomes a hybrid mind, capable of creating at the speed of thought.
After On and the Origins of Centaur Programming
Rob Reid’s After On doesn’t just imagine superintelligent AI—it explores how humans might collaborate with it in deeply symbiotic ways. One standout concept is Centaur programming, where the programmer isn’t replaced by AI, but augmented by it.
“The Centaur isn’t half-human, half-machine. It’s a full human and a full machine, working in tandem—each amplifying the other’s strengths.”
— After On, Rob Reid
In Reid’s vision, the Centaur model emerges when:
The human sets the direction, defines what “good” looks like, and makes high-level decisions.
The AI executes rapidly, recalls every syntax nuance, and offers suggestions drawn from billions of code examples.
This mirrors what we’re seeing today with tools like GitHub Copilot—especially in frameworks like Blazor and Next.js, where:
You sketch out a modular onboarding flow, and the AI fills in the async validation logic.
You define the UX narrative, and the AI scaffolds the components, hooks, and state management.
You architect for clarity and conversion, while the AI handles the repetitive glue code.
Reid’s Centaur isn’t just a metaphor—it’s a blueprint. The magic happens when the human remains the strategist, and the AI becomes the tireless executor.
That’s exactly how I feel when I pair with my Copilot assistant. I bring the intent, the architecture, the taste. The AI brings speed, syntax, and encyclopedic recall. Between us, we get velocity without chaos.
A Real Moment
I sketch the goal: “Modular onboarding flow with async validation.”
The AI scaffolds the Next.js components, hooks, and form logic.
I refactor, shape, and validate. The AI adapts.
I stay in the code. I keep the reins.
It’s not outsourcing. It’s orchestration.
The Centaur model works because I know what good looks like. I know what should be written and how. The AI just types faster than I do—and never forgets a semicolon.
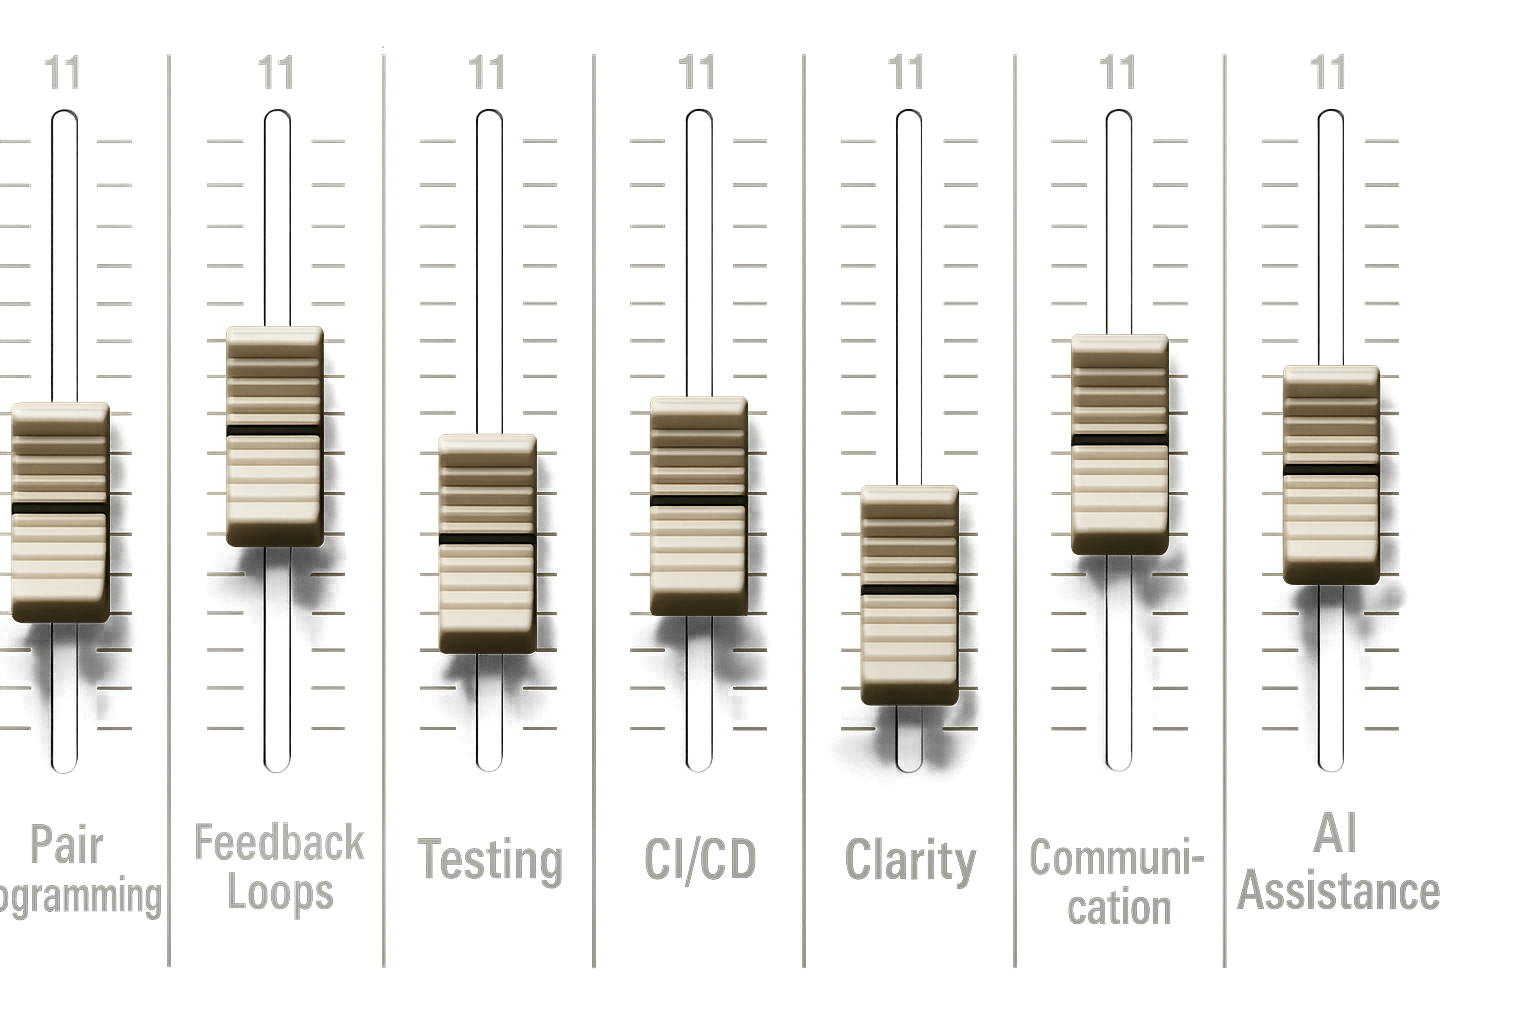
Think of it as Extreme Programming with AI—but with every dial cranked to 11.
Back in the mists of software time—somewhere between waterfall and the rise of agile—we discovered something important. Discipline wasn’t a buzzword. It was survival. Test-driven development, code katas, pair programming: these weren’t just practices. They were the scaffolding. This scaffolding kept our code from collapsing under its own cleverness.
Now, AI agents are here. They write code, refactor classes, generate tests, and even draft product requirements. We want to keep the gains. To avoid the mess, we need to bring our old disciplines with us.
A Brief History of XP
Extreme Programming emerged in the mid-90s, when Kent Beck was leading the Chrysler C3 payroll project. Faced with shifting requirements and mounting complexity, Beck doubled down on practices like testing, simplicity, and communication. XP became one of the earliest agile methodologies. It is built around frequent releases, pair programming, and test-first development. It also emphasizes close collaboration with customers. It was agile before agile had a manifesto. XP asked: what if we turned all the good practices up to 10? Now, with AI, we’re turning them up to 11.
From Vague Thought to Structured Execution
One of the most game-changing aspects of working with AI isn’t just the code generation—it’s the ability to scaffold entire workflows from a few offhand ideas. A vague prompt like “build a coffee tracking feature with accurate caffeine calculations” doesn’t just produce a few lines of code. It produces a fully fleshed-out product requirements document, complete with domain models, goals, constraints, and technical requirements. From there, epics emerge naturally, and those epics break down into tightly scoped tasks.
Each task can be turned into a detailed ticket, complete with acceptance criteria, file paths, and even the exact prompt needed to guide the AI. The result is a development pipeline that feels less like delegation and more like orchestration.
Here’s an example from a recent project:
# Issue #002: Create Coffee Type and Size Enumerations

**Labels:** `epic-1`, `enumeration`, `high-priority`, `foundation`
**Milestone:** Phase 1 - Anonymous User MVP
**Epic:** Epic 1 - Core Domain Models & Database Setup
**Estimated Time:** 1-2 hours

## 📋 Description

Create enumerations for coffee types and sizes with associated caffeine content calculations. This provides standardized coffee types and enables accurate caffeine tracking across the application.

## 🎯 Acceptance Criteria

- [ ] CoffeeType enum includes common coffee types with base caffeine values
- [ ] CoffeeSize enum includes size variations with multipliers
- [ ] Extension methods provide caffeine content calculations
- [ ] Display names configured for user-friendly presentation
- [ ] Unit tests verify all calculations are accurate

## 🔧 Technical Requirements

- Create separate enum files for organization
- Use System.ComponentModel.DataAnnotations.Display for display names
- Add extension methods for calculations
- Include XML documentation
- Follow C# naming conventions

## 📝 Implementation Details

### File Locations
- **Coffee Types**: `src/CoffeeTracker.Api/Models/CoffeeType.cs`
- **Coffee Sizes**: `src/CoffeeTracker.Api/Models/CoffeeSize.cs`
- **Tests**: `test/CoffeeTracker.Api.Tests/Models/CoffeeTypeTests.cs`

### Coffee Types Required
```csharp
- Espresso (90mg caffeine base)
- Americano (120mg caffeine base)
- Latte (80mg caffeine base)
- Cappuccino (80mg caffeine base)
- Mocha (90mg caffeine base)
- Macchiato (120mg caffeine base)
- FlatWhite (130mg caffeine base)
- BlackCoffee (95mg caffeine base)
```

### Coffee Sizes Required
```csharp
- Small (0.8x multiplier)
- Medium (1.0x multiplier)
- Large (1.3x multiplier)
- ExtraLarge (1.6x multiplier)
```

## 🤖 Copilot Prompt

```
Create C# enumerations for coffee types and sizes in a .NET 8 Web API project with these specifications:

Create a `CoffeeType` enum with these coffee types:
- Espresso (90mg caffeine base)
- Americano (120mg caffeine base)
- Latte (80mg caffeine base)
- Cappuccino (80mg caffeine base)
- Mocha (90mg caffeine base)
- Macchiato (120mg caffeine base)
- FlatWhite (130mg caffeine base)
- BlackCoffee (95mg caffeine base)

Create a `CoffeeSize` enum:
- Small (0.8x multiplier)
- Medium (1.0x multiplier)
- Large (1.3x multiplier)
- ExtraLarge (1.6x multiplier)

Create extension methods:
- `GetBaseCaffeineContent(this CoffeeType type)` - returns base mg
- `GetCaffeineContent(this CoffeeType type, CoffeeSize size)` - returns calculated mg
- `GetDisplayName(this CoffeeType type)` - returns user-friendly name
- `GetDisplayName(this CoffeeSize size)` - returns user-friendly name

Requirements:
- Use System.ComponentModel.DataAnnotations.Display for display names
- Add XML documentation for all members
- Create comprehensive unit tests that verify all caffeine calculations
- Follow clean code principles
- Make calculations accurate and realistic

Place in `Models/CoffeeType.cs` and `Models/CoffeeSize.cs` with tests in the test project.
```

## ✅ Definition of Done

- [ ] CoffeeType enum created with all required coffee types
- [ ] CoffeeSize enum created with size multipliers
- [ ] Extension methods implemented for caffeine calculations
- [ ] Display attributes added for user-friendly names
- [ ] XML documentation added to all public members
- [ ] Unit tests written covering all calculations
- [ ] All caffeine calculations verified for accuracy
- [ ] Tests achieve >90% coverage
- [ ] All tests pass

## 🔗 Related Issues

- Depends on: None
- Related to: #001 (Coffee Entry Domain Model)
- Blocks: #003 (Update DbContext)
- Epic: #Epic-1 (Core Domain Models & Database Setup)

## 📌 Notes

- Caffeine values are based on industry standards and research
- Extension methods enable easy calculation throughout the app
- Enums provide type safety and consistency
- Display names support future internationalization
- Keep calculations realistic for health tracking

## 🧪 Test Scenarios

- Verify each coffee type returns correct base caffeine
- Test size multipliers calculate correctly
- Validate all combinations of type + size
- Ensure display names are user-friendly
- Test edge cases and boundary conditions

---

**Assigned to:** Development Team
**Created:** July 10, 2025
**Last Updated:** July 10, 2025
The ticket includes a clear description, a checklist of acceptance criteria, technical requirements, file locations, and even a Copilot prompt that defines exactly how the code should be structured. It outlines extension methods, display names, XML documentation, and unit tests—all scoped to fit within a clean architecture pattern.
The prompt itself is rich with intent. It doesn’t just say “create enums.” It specifies caffeine values, size multipliers, naming conventions, and test coverage expectations. The AI responds with structured output that fits seamlessly into the project’s architecture.
The Design Compass: Copilot Instructions as Architectural Guide
To make this work consistently, I use a copilot-instructions.md file. This file acts as a design compass, guiding the AI toward clean, maintainable output. It defines folder structures, naming conventions, serialization rules, and testing strategies. It’s not fluff—it’s a contract between me and the AI.
When I prompt “create a new feature for coffee tracking,” I don’t get generic spaghetti. I get models in /Domain/Entities, interfaces in /Application/Contracts, handlers in /Application/Features/Coffee, and controller scaffolding that respects route conventions. The AI becomes an active participant in architecture, not just a glorified autocomplete
Microtask Workflow: Staying in the Code
Once the tasks are defined, the workflow becomes beautifully simple. I branch on the task, complete it with AI assist, refactor where needed, open a pull request, and merge. Then I move on to the next task.
Each task wraps in about an hour. That means pull requests are small, reviews are fast, and the developer stays engaged. The AI doesn’t drift off into hallucination territory because the context is tight and the scope is clear. I’m not just watching code appear—I’m shaping it, validating it, and staying in the code.
Triad Programming: You, Your Teammate, and Your AI
Pair programming becomes triad programming. I’m not just working with a human partner—I’m collaborating with an AI assistant that never sleeps, never complains, and occasionally hallucinates. The key is discipline. I validate AI suggestions like I would junior dev input. I keep the human eye on architecture and long-term maintainability. I guard my principles and don’t let velocity compromise values.
Why This Matters
AI can scaffold ideas instantly. But without structure, it can also generate spaghetti faster than you can untangle it. That’s why discipline isn’t optional—it’s the difference between collaboration and chaos.
Hallucinations happen when context is vague or sprawling. By keeping tasks small and tightly scoped, I limit ambiguity and give the AI clear boundaries. I stay “in the code,” reviewing each piece as it’s created, not after a 500-line dump. This clarity means fewer surprises, fewer rewrites, and far fewer “what on earth is this doing?” moments.
When AI generates large chunks of code, it’s easy to lose track of intent. But with microtasks, I know exactly what’s being written and why. I can refactor in real time, shaping the code to match my architecture. I maintain ownership of the design, even if the AI does the typing.
It’s not about outsourcing—it’s about augmenting my thinking while keeping my hands on the wheel.
Back in what now is probably in computer terms the mist of time, we used to do test driven development. We engaged in deliberate practice using code katas. This helped us improve our keyboard, refactoring, and coding skills.
Well with the advent of AI and programming agents, we can do that again! Turning the agent into a co-programmer in a remote world.
After COVID, work has become a lot more remote. Pair programming has become more difficult. This is true even with the advances in screen sharing and multi-editing in our integrated development environments. I began to think about the possibility of using copilot as a programming pair. We can work together in the “ping pong” programming style. This style can be so productive and fun. We would get the advantages of AI while allowing me to continue to practice my programming skills. This approach helps in avoiding the loss of productivity, which has been gained by using AI Agents.
“Ping-pong” pair programming is a style of pair programming. Two developers take turns writing tests and production code for a feature.
The sequence starts with the first developer writing a filing test. Then, the second developer writes the production code to make the test pass. They refactor all the code. Then, they write the next failing test. After that, the first developer writes the production code to make the test pass and refactors. The sequence is continued until the feature is finished and there are no more tests to write.
Instructions can guide Copilot. They are added to every prompt. These instructions form part of the context in which Copilot works. These instructions are stored in a file called “copilot-instructions.md” and are made up of text that describes in natural language the guidelines.
# Ping Pong Programming (AI & Programmer Roles)

## Sequence of steps
1. The programmer writes a failing test.
2. The AI (Copilot) makes the test pass in the simplest way possible.
3. The AI (Copilot) refactors the code to improve it, if needed.
4. The AI (Copilot) updates the specification file to reflect that the test has passed.
5. The AI (Copilot) writes the next failing test.
6. The programmer makes the new test pass in the simplest way possible.
7. The programmer refactors the code to improve it, if needed.
8. The programmer updates the specification file to reflect that the test has passed.
9. Repeat steps 2–6, alternating roles, until the feature is complete.

## Rules
Only one failing test should be added at a time.
Each participant (AI or programmer) only does their assigned steps before handing off.
Refactoring should be done after making a test pass, before writing the next test.
The specification file should be updated after a test passes to reflect the current state of the feature.

## C# Styling Guidelines
- Use PascalCase for class names and method names.
- Use camelCase for local variables and parameters.
- Use meaningful names for variables and methods.
- Use `var` when the type is obvious from the right-hand side.
I wanted to include the specification for all the tests as part of the copilot context. This applies to this version of the kata. The specification can be written in any format we want. I used a simple checklist style in markdown. I wrote the list in a function name style so I can copy and paste it into the test file. The agent will sometimes look ahead, which is cheating. but I think we can let him off.
# String Calculator Specification

we will be doing these things in order, when a step is completed mark it as done by adding a checkmark in front of it.

[]  Given_an_empty_string_the_result_should_be_0

[]  Given_a_single_number_the_result_should_be_that_number

[]  Given_two_numbers_separated_by_a_comma_the_result_should_be_their_sum

[]  Given_an_unknown_amount_of_numbers_separated_by_commas_the_result_should_be_their_sum

[]  The_delimiter_can_be_specified_using_a_special_syntax_at_the_beginning_of_the_string e.g. //;\n1;2 should return 3

[]  If_the_input_contains_negative_numbers_an_exception_should_be_thrown_with_a_message_listing_the_negative_numbers

[]  If_the_input_contains_numbers_larger_than_1000_they_should_be_ignored_in_the_sum

[]  The_calculator_should_handle_new_lines_as_delimiters e.g. 1\n2,3 should return 6

[]  The_calculator_should_handle_delimiters_of_any_length e.g. //[***]\n1***2***3 should return 6

[]  The_calculator_should_ignore_whitespace_around_numbers e.g. 1 , 2 should return 3

[]  The_calculator_should_handle_empty_delimiters e.g. //;\n1;;2 should return 3

[]  The_calculator_should_handle_multiple_custom_delimiters e.g. //[;][#]\n1;2#3 should return 6

[]  The_calculator_should_handle_mixed_delimiters e.g. //[;][#]\n1;2#3 should return 6

[]  The_calculator_should_handle_escaped_delimiters e.g. //[;][#]\n1;2\\#3 should return 6

[]  The_calculator_should_handle_escaped_custom_delimiters e.g. //[;][#]\n1;2\\#3 should return 6

[]  The_calculator_should_handle_escaped_mixed_delimiters e.g. //[;][#]\n1;2\\#3 should return 6

[]  The_calculator_should_handle_escaped_empty_delimiters e.g. //[;][#]\n1;;2 should return 3

[]  The_calculator_should_handle_escaped_whitespace_around_numbers e.g. 1 , 2 should return 3
And finally the prompts a prompts file that is useful to copy the prompts I used to do the kata the first time,
# Getting started with the kata
we are doing ping pong programming on this kata, so its your turn there is a failing test, make it pass, refactor, update the spec and write the next failing test for me.

# Next turn
I have made the test pass, refactored the code and written the next failing test.
your turn.
The starting repository is here. It includes a dummy test and read me file. There is a complete setup to do the kata in c#.
One of the issues when working with AI copilots is that we can understand what the code is doing. But, we lose track of how the code actually works. It becomes difficult to know where each part is among the stream of code that copilot can produce.
We want to keep the productivity gain of using agents. We also want to be “in the code,” understanding not only the how but also the where and why. Pair programming with the agent allows us to be involved in the code actively. It involves writing and refactoring the code as it is produced not only by us but also by the agent.
Copilot has become a great tool for working with code. I have found myself moving away from Visual Studio. I am working more and more in Visual Studio Code. This shift can feel strange for dot net projects. You also have a different view of the file structure.
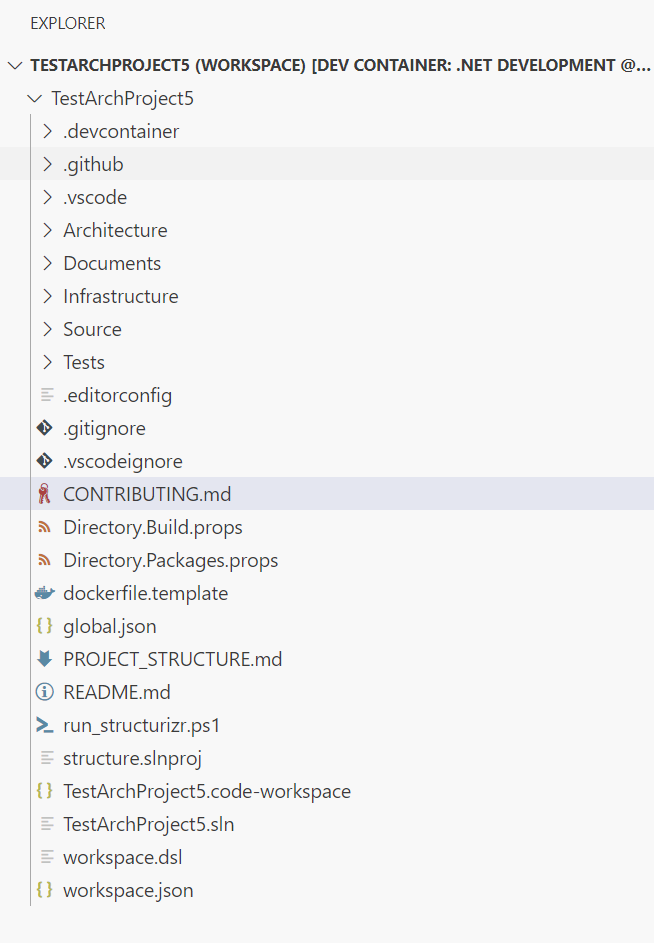
With this in mind, I wanted to guide Copilot more around the way I structure projects. I have created a project template for myself.
It looks daunting at first but the core of the template is
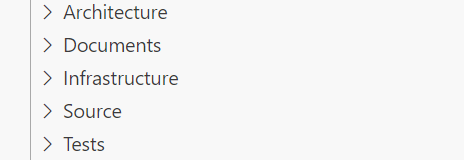
Architecture and Documents
I use Structurizr (https://structurizr.com/) to build my architecture diagrams. The interface can also show any architecture documentation. I store this documentation in the documents folder to hold any text documents. This follows the idea of having documentation near the code, actually within the same repository as the code.
Structurizr can run locally using the run_structurizr.ps1 script, which downloads the latest docker container, and adds the project as a linked folder. so the structurizr web interface can display both the diagrams and the documents from the project.
The script will call the workspace.dsl. This file is the starting point for building the architecture diagrams. The actual diagrams themselves are coded within the models, views, and configuration dsl files in the architecture folder.
Infrastructure
This folder is for the infrastructure as code. In most of my cases, it is for the dotnet Aspire host and service defaults projects.
Source and Tests
The source directory is where the actual application or website and services go. The test directory is where the unit and integration tests for the application go.
Copilot
I built the template because I wanted Copilot to understand where I wanted to put things. I also wanted some control over its coding style. There are several files in the copilot directory. They help with generated code style. They also give prompt templates for common tasks.
Other Files
There are the other usual files. These include a dotnet solution file and an editor configuration file. They help set up the environment and the editor.
The Docker file template and the workspace.json are the Visual Studio Code files that set up a developer environment within a Docker container. They also set up the Visual Studio workspace.
Let’s have a chat about something that’s been quietly transforming my day-to-day as a developer: the MAP Stack. The MAP Stack is one of those rare shifts that actually delivers on the promise of making life easier, not just different.
What’s the MAP Stack, Anyway?
Think of the MAP Stack (Modern Automated Programming) as a toolkit, not a single app. It’s a blend of:
Your Editor: I’m still living in Visual Studio Code, and it’s still the heart of my workflow.
An AI Agent: Tools like GitHub Copilot sit right in your editor, ready to help out with code suggestions and more.
MCP Servers: These are the real magic. They feed your AI agent with all the context it needs—project structure, docs, APIs, you name it—so the AI’s suggestions are actually relevant.
Working Practices: The way you work shifts a bit, but it’s all about making the most of your new AI-powered teammate.
Put it all together, and you get code that’s cleaner, faster, and (dare I say) more fun to write.
How My Workflow Changed
Here’s how a typical day looks now:
Pick a Task: I start with a clear goal—maybe a bug fix or a new feature from Jira or GitHub Issues. Small is beautiful here.
Branch Out: New branch for every task. Keeps things tidy and makes code reviews a breeze.
Iterate with the Agent:
Prompt: I write a clear prompt for the AI—sometimes it’s a feature, sometimes a test.
Generate: The AI, powered by all that context from the MCP server, spits out code or tests.
Review: I check the output. Does it work? Is it secure? Does it fit our style?
Refine: If it’s not quite right, I tweak the prompt or the code and try again.
Commit: Once it’s good, I commit the changes.
Repeat: Rinse and repeat until the task is done.
Pull Request: When I’m happy, I open a PR for review.
Review & Merge: Human eyes (and sometimes another AI) check it over, then it’s merged in.
Deploy: Off to staging or production it goes.
Close the Ticket: Task complete!
The biggest shift? I spend less time typing and more time thinking—prompting, reviewing, and refining. It’s a different kind of productivity, and honestly, it feels great.
The Developer’s New Role
So, what’s changed for me as a developer? I’m not just writing code—I’m guiding the AI, reviewing its work, and making sure everything fits together. My focus is on:
Prompt Engineering: Getting good at asking the AI for exactly what I need.
Critical Review: Making sure the AI’s code is solid, secure, and fits our architecture.
Big Picture Thinking: Keeping the overall design in mind, not just the lines of code.
Debugging: Fixing issues, whether they’re mine or the AI’s.
Strategy: Focusing on what really matters for the project and the business.
In short, I’m more of a conductor than a soloist now—making sure all the pieces come together, with the AI as a powerful instrument in the orchestra.
Wrapping Up
The MAP Stack isn’t just a new set of tools—it’s a new way of working. With AI agents and MCP servers in the mix, I’m building better software, faster, and spending more time on the parts of the job I actually enjoy. If you’re curious about how this could fit into your workflow, give it a try. You might just find yourself with more time for coffee breaks—and better code to show for it.
I have been busy trying out some new to me ways of working and finding ways to document my code and repositories. So here is the first try-out of the LocalStack tutorial, creating an s3 static website, with the infrastructure defined in terraform.
The aim is to try out local stack, sort out a structure for projects going forward and some documentation ideas.
Allows us to run and test Amazon Web Service (AWS) applications locally, in this case we can use it to create the infrastructure using Terraform for our website, we can then run the same terraform scripts against our live AWS account to create the website in production.
Infrastructure as code, this is one of the many solutions to creating infrastructure in the cloud, writing a script that the terraform application runs against the AWS cloud APIs to create the infrastructure required, rather than logging into AWS and creating the infrastructure manually, this allows us to version our infrastructure and have code that will always create the infrastructure in the way we want. Terraform is a cross platform application so using different providers it can create infrastructure in any supported cloud provider, although the scripts we write are provider specific.
Last up in this tooling chain, is the documentation, using the C4 model and providing diagrams as code, along with structured and linked documentation, including Architecture Decision Records (ADR) Structurizr provides a website that runs in a local docker container.
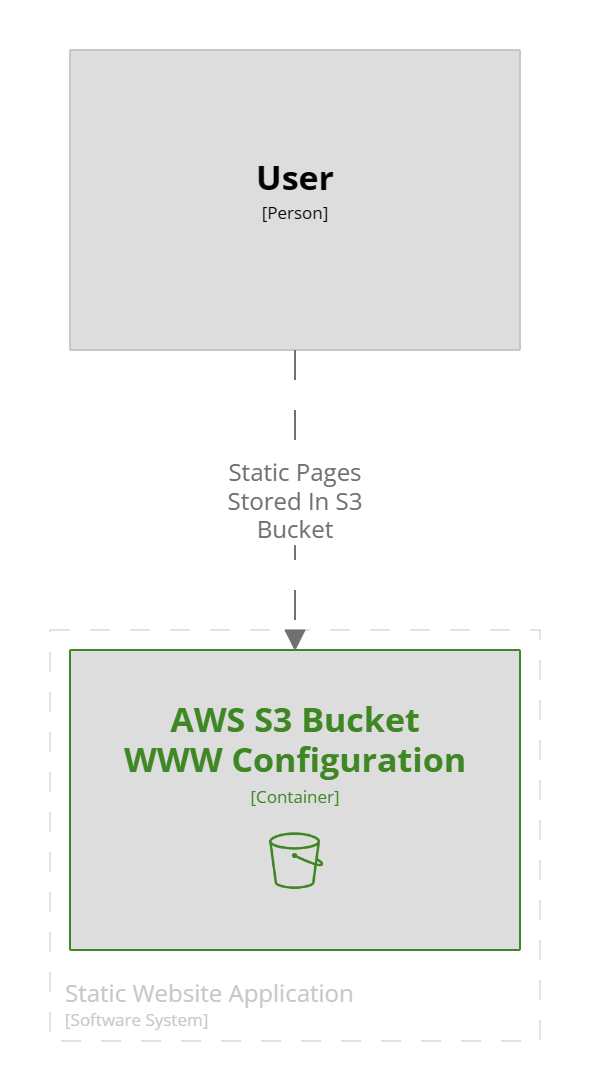
This is a small project so the diagram is simple, the documentation however shows how to run the example.
A Structurizr code file uses a simple JSON format that allows the objects in the diagram to be nested each level moving down thought the levels of a C4 diagram automatically generating the diagrams as required, although the developer gets a lot of control of the layout within the views section. This product deserves a lot deeper review than I am giving it here, but it will hopefully be appearing in my repos from now on.
workspace {
!docs "docs"
model {
user = person "User"
website = softwareSystem "Static Website Application" {
bucket = container "AWS S3 Bucket\nWWW Configuration" {
tags = "Amazon Web Services - Simple Storage Service S3 Bucket"
}
}
user -> Bucket "Static Pages Stored In S3 Bucket"
}
views {
container website {
include *
autoLayout
}
Its the ability to have a whole website full of documentation with the repository that’s runnable from the local machine available while you code is the secret source.
To run the examples above clone the repository from
ensure you have docker running on the local machine, navigate to the architecture folder and run the PowerShell script this will download the Structurizer container and run the documentation website available on the local machine at http://localhost:8080/
It sounds a lot to install, but the net result is we have a way of building cloud infrastructure locally and a complete documentation website that sits with the project. Most of it is docker containers so there is not actually much more than the command line tools stored on the local machine.
So I now have a project structure, documentation tooling and a way of creating infrastructure for my job board project.
A little bit of planning before we start to code the board, to start we need to be able to add, delete and search the jobs in the job board, this is the minimum functionality we are going to need just to get started. Having built some of this before, and because I am a back-end engineer, I am going to start with the backend services.
So here we have three web functions that will post, delete and search.
Post Job: will take some data, validate it as being a valid job and then raise a command message, directed at a Post Job Worker, the worker validates the incoming message and stores the given data in the data store, then raises a Job Changed Event, to inform the rest of the system about the change in the job.
Delete Job: will take some data, validate it as being a valid existing job and then raise a command message directed at a Delete Job Worker, the worker validates the incoming message and marks the data as deleted in the data store, and then raises a Job Changed Event to inform the rest of the system about the change in the job.
Search Jobs will take some search criteria, validate it, and make the appropriate call to the search jobs worker, this will return the required data to the user.
Why the messaging between the “Public API” and the workers, in fact why have the workers? This is all to do with the preservation of data primarily. When a user posts a job, we do not want to ever lose that data in a failed, using a messaging system with dead queues will allow us to replay failed validated messages, this is important if someone is paying money for us to display their job. We are allowing for failure directly the data has been validated.
What about this Job Changed Event? So far all we are building is the bones of a system, if we want to add calls to google indexing API, because the job has been updated or deleted, how about an email to subscribed users when a job matching some criteria arrives, these systems will need to know about changes to the jobs, and this event can tell those systems.
We now have a plan of what we are going to build, the questions now are.
What is the data store going to be?
What is the public API, a web API, or functions?
What messaging system are we going to use?
What are the workers? another API or functions?
Let’s start with the easy ones first:
Question 2: The public API will be a web API, it looks the best way to go having spun up the template, we get a nice swagger ui, which will be great for initial testing
Question 4: Mainly because we have used the web API template for the public api, and this is as much an exercise in learning as anything else, the workers will all be functions triggered by receiving a command message.
Question 1: A Job Advert feels like a document, we will probably change its shape as well develop the system potentially even after release, a SQL database feels a bit to ridged, Key/Value store, may not give us the search flexibility we may need in the future, we are on Azure so let’s go with Cosmos-db and see where this takes us.
Question 3: On AWS this would be SNS/SQS, there must be an equivalent in Azure, looking that all up, it appears that Azure Service Bus and Queue Storage
Now to create some work item tickets on the Azure devops board, and look into building a walking skeleton, deployed to Azure.
It has happened to a lot of technical people over the last year or two, and sadly I have joined the club.
But instead of looking at it as an end, which is very easy, lets look at it as a new oppitunity, and a reset.
Dusting off the CV, and looking at the last four and a bit years of my career, what do I like, what did I not like and what do I need to change, well been doing lots of node.js, javascript and typescript. but to be honest my heart is in dot net c# and the Microsoft stack. So its time to renew my knowledge, being in a startup I found made it diffecult to take time to learn, so now is the time to do all those courses I thought about and look into all the technologies that have grown in the past four years. To that end I need a reference project.
Enter “My Job Board”, this will turn into, my own reference project, I am intending to build and deploy to multiple clouds a full (well eventually I expect) job board, with as many features as we can build all test driven, using technologies that interest me, so we may end up with multiple websites in different languages for all I know at this time, but the core will be Dot Net. for example I know AWS quite well, but I have not looked at Azure so now is the time, how do we deploy, and build intrfastructure on Azure?
All this will solidify my knowledge of modern c# development, and infrastructure
This is the post of intention.
So you can expect a flurry of postings while I pick this up, and of cause look for a new position, but there is a lot of new things to explore in the future so a reference project will give us a chnce to look at AI, payments, monitoring and alerting, infrastructure choices, archecture of the whole application, one repo or many for the code, the choices are endless, oh and of cause mobile apps.
Most of this is going to come from other sites and blog posts, along with my own notes on things I found diffecult. So the aim is to setup a development environment on windows 11 WSL2 for I think Rust to start with, but suppose most of this will be general for most languages, I can see Typescript being installed as well at somepoint.
Settng up windows, so far this is a fresh install, with dark mode set, internet setup and the wordpress desktop app installed so I can tap away at this article.
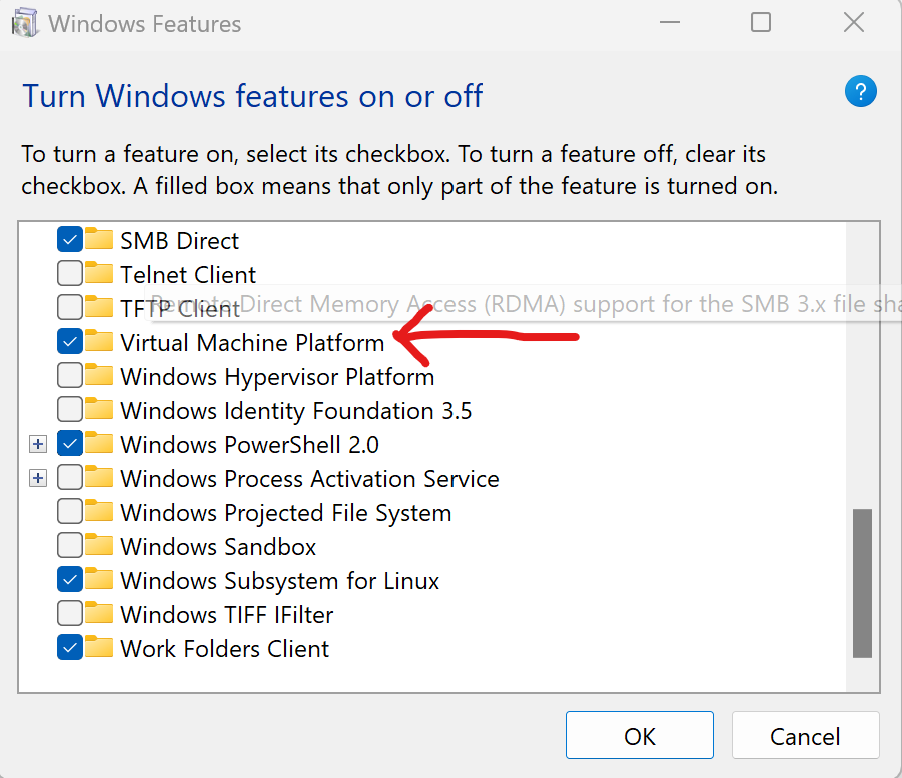
Windows Setup Install WSL and Virtural Machine Platform, got to “Add Remove Windows Features” and select the items, the machine will need to restart
Now Install windows terminal, this may not be required for windows 11 as it appears to be there by default.
We do however have to allow for script execution, as we will want this later on to install fonts etc, follow the instructions here to allow powershell to execute scripts
Next set WSL2 to the default for all distros we install. $> wsl --set-default-version 2
Install Alpine Linux from the windows store, note this is not available via winget yet
Clicking open once its downloaded installs the distro, and now Alpine linux appears as one of the options for windows terminal
Before we dive into setting up the WSL side of things install Visual Studio Code, this can be done using winget.
$> winget install XP9KHM4BK9FZ7Q
And some fonts which will include the glyphs for coding, there are lots of choices these are the ones I have used https://github.com/powerline/fonts/releases/tag/2015-12-04, down load and follow the instructions to install on windows
Now onto the Linux bit, open windows terminal and an Alpine tab, we need to do some basic setup now for a new linux distribution before we continue.
Now setup git with the username and user email $> git config --global user.name “user_name” $> git config --global user.email "email_address"
Before we an install rust and start developing we need the development tools for Alpine, to install these $> sudo apk update $> sudo apk add build-base
and now we can install Rust at long last. $> curl –proto ‘=https’ –tlsv1.2 -sSf https://sh.rustup.rs | sh $> source $HOME/.cargo/env
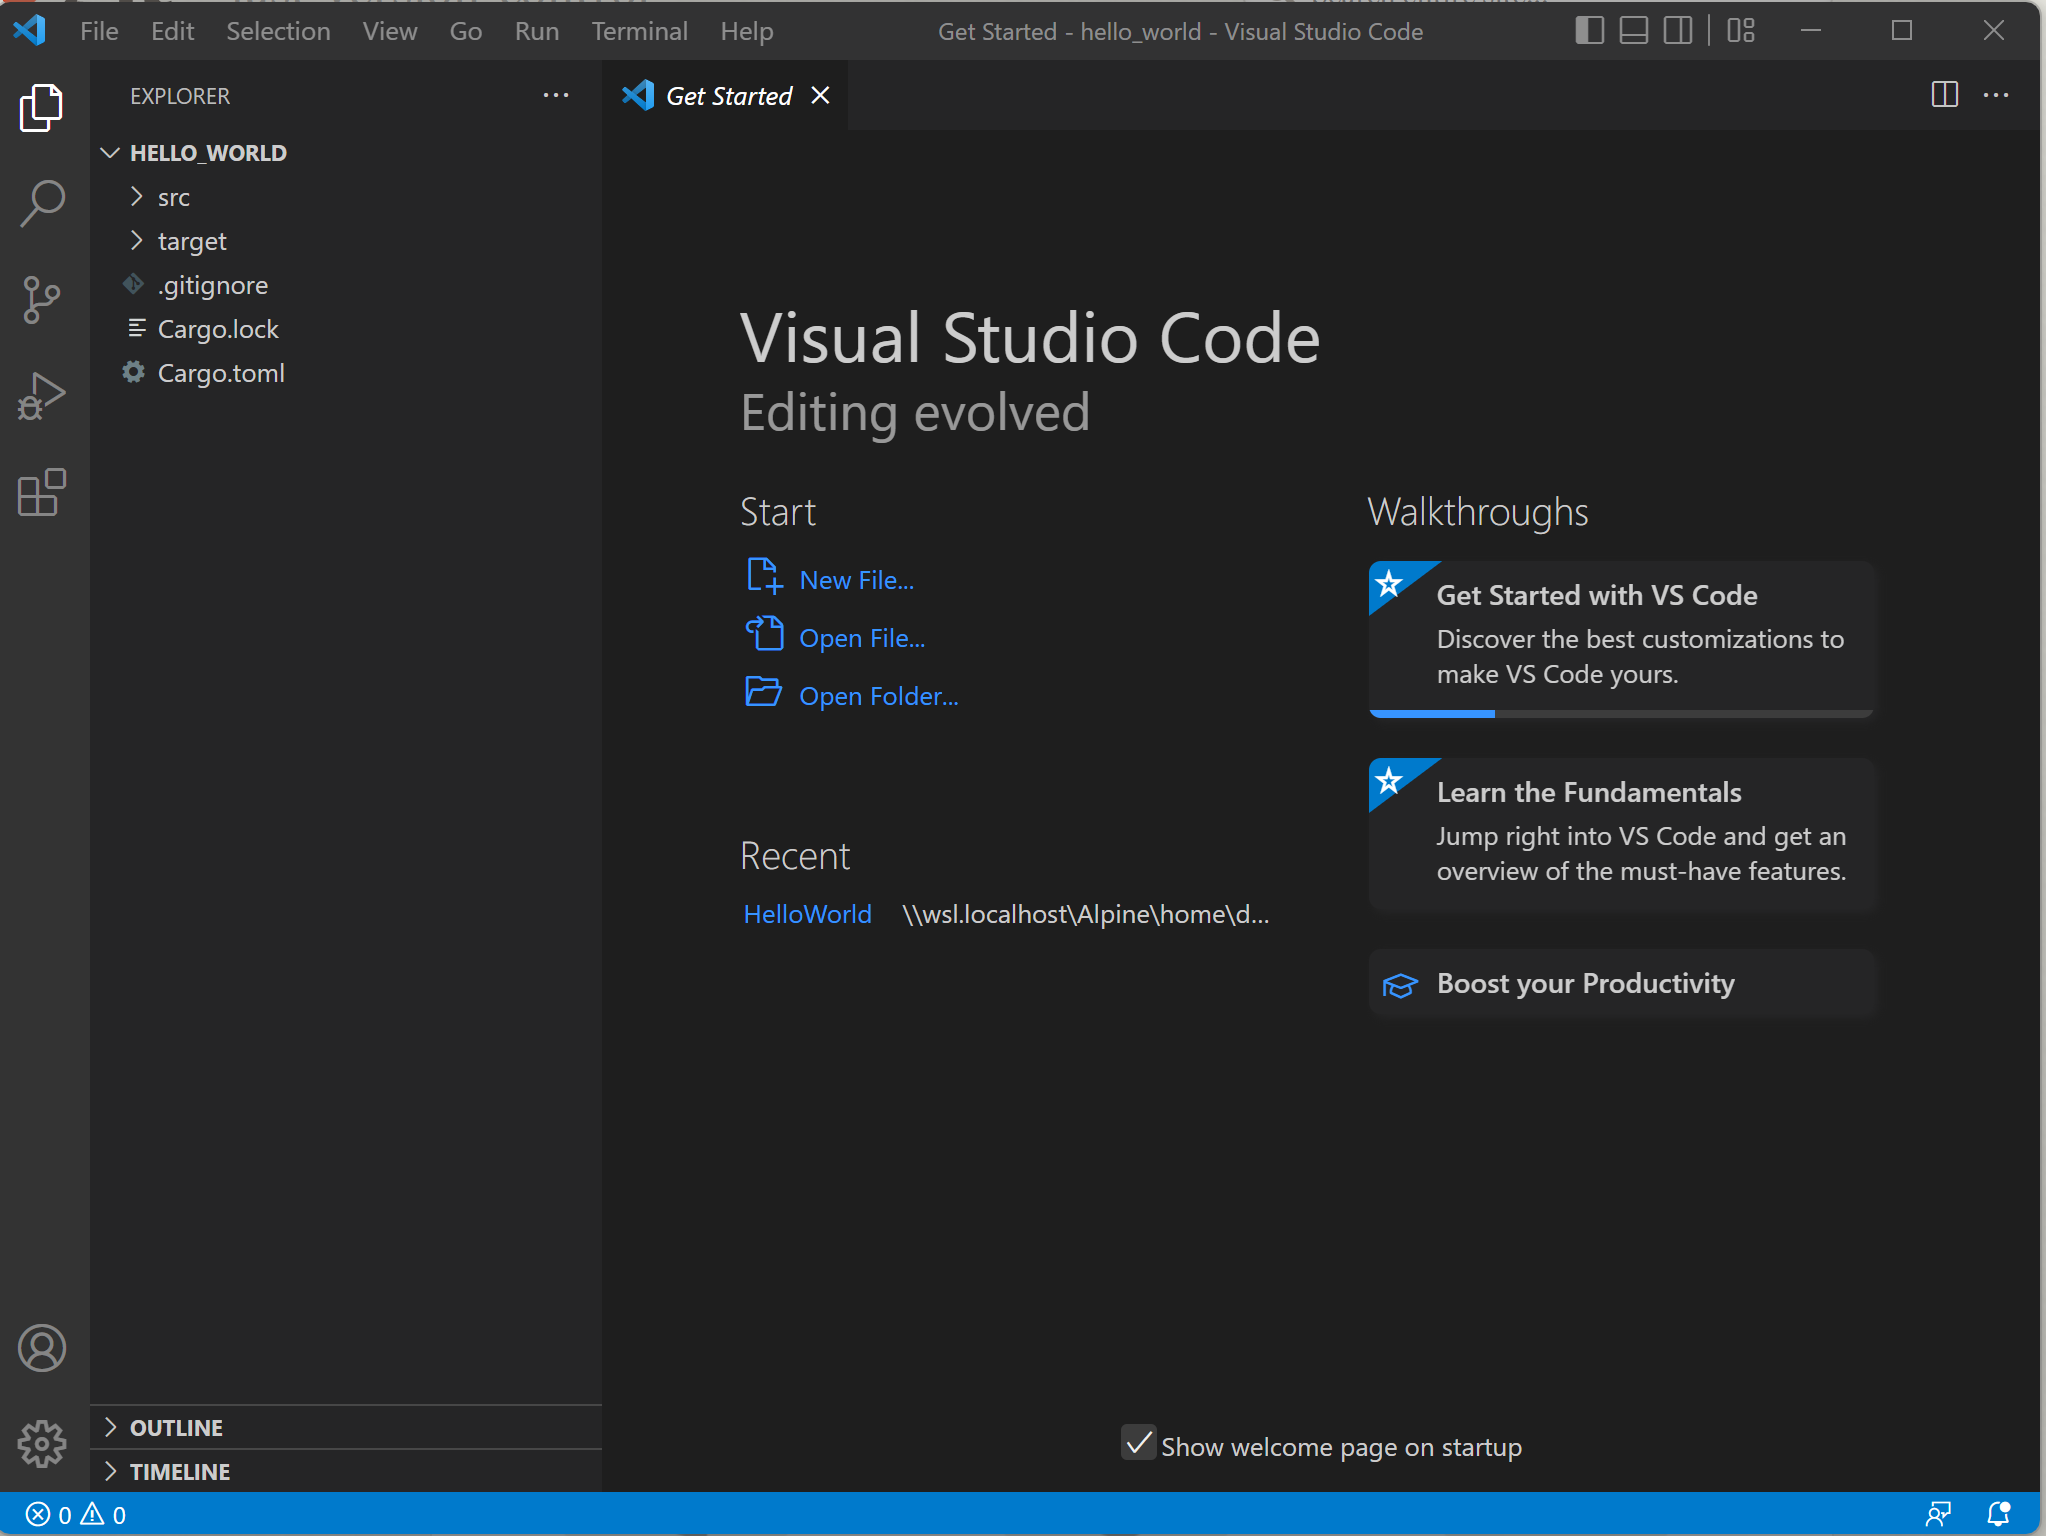
And to check that everything has installed correctly, lets create the default Rust Hello World project $> cargo new HelloWorld
Then cd into the created project, and open the files in visual studio code $> cd hello_world $> code .
So there I was lovely new computer, I installed Ruby 193, old tests which needed it, don’t ask, and of cause the ruby dev kit, then a quick bundle install and I will be ready to go, but instead I get a cryptic message from the install saying something like.
C:\devkit>gem install rdiscount --platform=ruby
Temporarily enhancing PATH to include DevKit...
Building native extensions.  This could take a while...
ERROR:  Error installing rdiscount:
       ERROR: Failed to build gem native extension.

C:/ruby/bin/ruby.exe extconf.rb
C:/ruby/bin/ruby.exe: No such file or directory -- extconf.rb
(LoadError)
Now even though I had not installed ruby using the installer, but using Chocolatey the trouble shooter did have a nice section displaying the text above which was close to what I had on my screen, apparently there are some registry settings that effect the dev kit.
that need to be checked, and the expected results, all but the third one worked fine, the third one, simply did not exist in my registry!
Another quick google with bing and I discovered that happily I was not the only one with the issue, but I did not find any real solutions.
The following is what I did to solve the issue, it “worked on my machine”, but editing the registry comes with risks and your results may be different.
I had a look at the registry entries for the ones that worked, both the HKCM keys
and both entries were the same, one for the 32bit environment and one for the 64 bit. So taking a quick leap in the dark and looking at the working entry for HKCU I fired up RegEdit and added an entry for the missing key making it exactly the same as the existing entry.